Block Printing 101: How to Block Print Fabric
If you've ever wanted to learn how to block impress textile, bookmark this post! Information technology's easier than you think.

Cake printing was i of my favorite techniques to experiment with in my printmaking classes in college. But it took some getting used to earlier I felt really comfortable and confident in what I could create with this new skill.
This printmaking technique is super fun for press on fabric, one time you know the basics. And it'southward easy too. So, today I'm sharing the complete guide to cake printing fabric for beginners.
If you're simply starting out, this guide will bear witness you everything you need to know to become started with block press. From the tools you'll need to the steps for going from a blank linoleum block to a finished, block printed slice of fabric.
And one more than affair… The steps for block press fabric vs block printing paper are reallysimilar. In fact, they're identical. The merely difference is in the type of ink you lot'll apply and in some cases the ink drying times. That'southward pretty much it!
Then, if you learn how to block print fabric, you'll also know learn how to print on paper. Which opens up a lot more possibilities for printing, right?! Click through to get started.
What is block printing?
Block printing is the relief process of printing onto material or paper using a hand-cut block, made of wood or linoleum. Afterward the block has been carved, ink is practical, and then information technology is printed. Hence, the name block printing.
Information technology'south a technique that has been around for more than than two thousand years. Originating in China, where it remained the most common press method in East asia for books and images until the 1800s.
Interesting fact: Initially, block printing cloth was the norm – virtually often existence printed onto silk cloths. It wasn't until hundreds of years after when it was somewhen adapted to paper, which is now probably the near widely used fabric for block printing.
Personally though, I love printing on textile, and then today'due south tutorial is all most block printing fabric. Let's jump in…


Basic Materials for Block Printing Fabric
- cake printing etching cake
- fabric block printing ink OR water soluble printing ink for paper
- linoleum cutter etching tool
- soft safety brayer
- acrylic sail, glass (or like)
- permanent marker
How to Block Print Fabric
Step 1: Create a design and draw information technology onto your linoleum cake.
The first step for cake printing is coming upward with a design. Utilise a permanent marker to draw the design direct onto the carving cake. That way, you know exactly what to cut and what you lot don't want to cutting. It really helps to have a visual guide.
You want to apply a permanent marker, as opposed to any other kind of mark or pen. This will ensure the ink from the marking doesn't come up off onto your fabric or paper while press.

Step 2: Get familiar with your tools and know when to use what attachments, etc.
Adjacent, using your carving tools, cull the size lino cutter attachment you want to use.
I often use the largest size to carve out larger areas, so it goes a little faster. In the carving tool I take linked the largest size it comes with is a #five and the smallest size is a #1. But for highly detailed areas, you'll probably want to use the smallest size (#1).
Additionally, you can utilize the knife blade tool (labeled #half dozen for the tool I linked) to carefully cut around the edges of a pattern. This would exist especially helpful if you're concerned about messing upwards and carving too closely into something. Great thing to do for beginners.
It creates more of a guide to follow and a stopping indicate for the other attachments to assist with those fine lines, etc. And it tin can as well be used to cut away excess material from the side of the block to make information technology easier to handle while stamping.
Side note: These blades and cutting attachments are very sharp! And so use caution with the etching tools and always be aware of how close your fingers and easily are to the blade. Too be aware of fingers that are property the linoleum cake in place opposite the tool. Information technology is always possible to loose control of your etching tool. Basically, just be conscientious.

Footstep iii: Start carving the linoleum block.
Based on what y'all learned in step two, select the best zipper. Then, begin cutting out the excess surface area away from the blueprint. Leaving the design raised, every bit shown in the photo. Use equally many of the different size options as you discover necessary, depending on your blueprint.


Pace 4: Ink your linoleum block.
If y'all're block printing on fabric, you'll want to use a block printing ink that is safe to use on fabrics. Information technology will say it's for material use correct on the tube, like this i for example.
Another choice for block printing fabric is using an ink pad that can exist used on fabrics, like this one. Using ink pads for block printing are best for pocket-sized lino blocks (2-three inches in size).
If you're using larger blocks, you'll probably desire to go the traditional route of inking, which I'll explicate below.
*As well, this method of using an ink pad isn't really a true grade of block printing. Simply information technology is a nice option when you lot're in a hurry, or desire to save money with the purchase of a few less tools.
If you're using a fabric ink pad and small linoleum block, open the ink pad and standing dabbing ink onto the lino block until the blueprint is fully (and evenly) covered.
If you're using a more than traditional method for inking, squeeze out a thin line of ink (whether its fabric ink or regular press ink for newspaper) toward the top of the acrylic sheet (or glass) palette.
Then use the soft condom brayer (the roller), to bring the ink down. Rolling the ink out a fleck on the surface of your palette earlier rolling information technology over your postage stamp in thin layers until the raised design is fully covered. Make sure the linoleum block isn't over inked or you could lose some of the fine details of your design when printing.
You'll notice when you whorl the ink out that it has a much different viscosity than regular paint. It'southward much more than tacky.
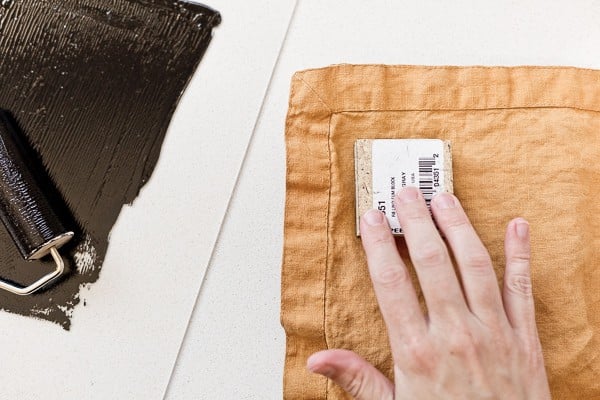
Step 5: Print cake pattern onto cloth (or newspaper).
Next, no matter how you've inked your lino cake, flip the cake over. Then press the inked design confront down firmly and evenly onto fabric or paper. Then, pull the stamp abroad from the cloth, straight up if y'all tin.
Echo steps 4 and 5 as desired. If you're using traditional block printing ink, let the surface air dry for 24 hours before using (this volition set up the ink). Or according to instructions on the ink tube. As some inks require more time to cure.
OR if you're using a material ink pad, wait for the blueprint to air dry, then heat gear up the ink (with an iron) to ensure the ink is permanent.

Linoleum Cake vs Wood Block
By and large, linoleum block (or lino block) is much easier to carve than forest block because information technology's a softer material. It's also a more affordable option for beginners and intermediate printmakers.
To carve into forest blocks, y'all need a whole different set of tools. Woods carving tools are much more expensive than linoleum carving tools. Why? Information technology's mostly because they accept to be able to cut through wood, which means they accept 2 be stronger, sharper, etc. Every bit you might be able to guess, wood blocks are a harder material to carve.
The results are a longer lasting block that tin can be printed again and again though, which is why then many people go that route. Just if yous're not creating a huge edition of prints, linoleum block is the way to go – especially when it comes to smaller crafting projects.
Mixing Block Printing Inks for Custom Colors
But like regular paint, you can hands mix inks to create custom colors. So, if y'all're decent at color mixing, you'll only need a bones set of primary colors (cherry, yellow, bluish) plus black and white to create any color you lot can imagine.
You can mix the colors correct on the acrylic canvass you use to ink upward your block and then push it all dorsum into a line for your brayer (like the traditional inking method in step 4) when you're ready to ink.
Hither'due south a set of inks for printing on newspaper (you'd all the same need a white ink for this one though), if you lot want to mix your own colors. And hither'south an oil based ink gear up that works on both fabric AND paper.

H2o Based Blockprinting Inks vs Oil Based Inks
The absurd thing about oil based inks are: they tin can be used on both fabric AND paper. But they take their drawbacks likewise.
Water based inks can exist removed from skin and wearable with lather and water. Then, they make clean up very easily, and again, are great for hobbyists.
Oil based inks typically need to cleaned up with mineral spirits or turpentine. Although, this set of oil based inks says that it tin can be cleaned with just soap and water.
Oil based inks also take longer to dry than water based inks. For case, when printing on fabric, oil based inks can have upwards to three weeks to fully dry. While h2o based cloth printing ink can exist dry in just 24 hours (or even but overnight) and is permanent for fabrics, just like oil based inks. Sometimes water based inks can run though, so it'southward something to keep in mind.


Let me know if yous have any specific questions almost cake printing that I didn't cover in this postal service and I'll be certain to answer.
Source: https://www.papernstitchblog.com/how-to-block-print-fabric/
0 Response to "Block Printing 101: How to Block Print Fabric"
Postar um comentário